Create your first request
Use our API reference to create you first Penbox request. You will be able to make an API call on CONNECT by putting the token in the authentication section.
This API endpoint is used to create a Penbox request that will be sent to the person of your choice.
Checkpoints
At this stage you should already have a generated token.For further information please go to 'Get your credentials'.
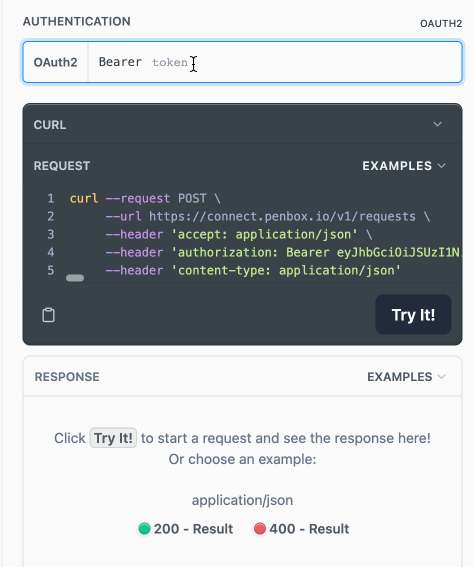
Use our API reference to create a request
- Go to CREATE a request
- Paste your generated token in the Authentication section
- Select 'Examples' and choose the option 'Example Integration Guide'
- Select 'Try It' to create your request
Congratulations you created your first request, it's that easy!
Explanations
Hostname and headers
| Attribute Type | Attribute Name | Attribute Value | Description |
|---|---|---|---|
| Hostname | URL | https://connect.penbox.io/v1/requests | Penbox Public Endpoint |
| Header | accept | application/json | Indicates that the request body format is JSON |
| Header | content-type | application/json | Indicates that the request body format is JSON |
| Header | authorization | Bearer eyJhbGciOiJSUzI1NiIs (...) | The client must send this token in the Authorization header when making requests to protected resource |
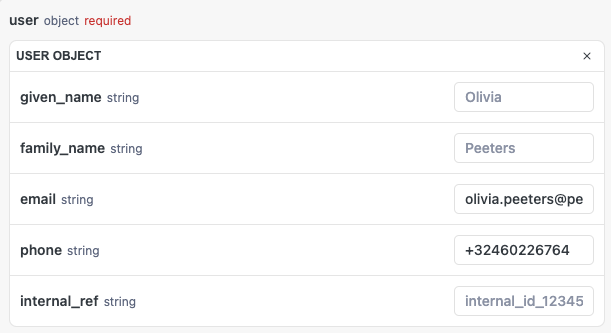
User object
| Attribute Name | Attribute Type | Mandatory | Description |
|---|---|---|---|
| given_name | string | true | The first name of the person you will send the Penbox request to. |
| family_name | string | true | The last name of the person you will send the Penbox request to. |
| string | false | The email address of the person you will send the Penbox request to. A notification via email will be sent if the information is filled. | |
| phone | string | false | The mobile phone number of the person you will send the Penbox request to. A notification via sms will be sent if the information is filled. The phone number needs to be in ISO format with the country prefix (eg. +32xxxxx). |
| internal_ref | string | false | You can use internal_ref if you have an internal reference number to identify the person you will send the Penbox request to. |
In the example generated above the user email and user phone are not pre-filled. If you would like to generate a Penbox request with a notification to the user by email or phone you can fill the email and/or phone attribute in the user object.
Data object
In the data object you can fill the following attributes to include this information in the Penbox request. This is an optional step but it's highly recommended to pre-fill already known data in the Penbox flow that is sent to the customer. Having certain information pre-filled reassures the customer and makes it easier for them to complete the flow.
"data": {
    "address_street": "station street",
    "address_number": "100",
    "address_zip": "1000",
    "address_city": "Brussels"
  }
Flow object
In the flow object you can find the slug attribute. This attribute is used to determine which Penbox flow you would like to use in your request. This is an attribute that is mandatory.
In this integration example the slug "demo-update' has been pre-filled to use the flow "Demo customer data update" flow.
"flow": {
    "slug": "demo-update"
  }
Options object
You can use the options object to parameter your flow. In this example you can choose to ask a legal document (e.g. ID document) in the request or not.
"options": {
    "ask_legal_documents": true
  }
External_args object
In the external_args object you can include parameters that will make it useful for you to process the data. All the attributes that you will put in external_args will be included in the exact same way when receiving the response of the request. Attributes in the external_args object can also be used to filter requests.
E.g: internal id, company id, etc.
 "external_args": {
    "company_id": "test001"
  }
Response payload
Here is an example of payload that you should receive as response and the explanation below.
{
  "id": "75d06157-75c7-4dc8-b090-e7064fd59544",
  "created_at": "2023-04-17T20:49:55.046Z",
  "status": "pending",
  "archived": false,
  "user": {
    "email": "[email protected]",
    "phone": "0484776960",
    "given_name": "Olivia",
    "family_name": "Peeters",
    "internal_ref": "internal_id_123456"
  },
  "external_args": {
    "company_id": "test001"
  },
  "flow": {
    "slug": "demo-update"
  },
  "links": {
    "fill": "https://form.superbroker.be/ddBhV3XHTciwkOcGT9WVRA",
    "app": "https://app.penbox.io/dev-box?id=75d06157-75c7-4dc8-b090-e7064fd59544"
  },
  "data": {
    "address_zip": "1000",
    "address_city": "Brussels",
    "address_number": "100",
    "address_street": "station street"
  },
  "options": {
    "ask_legal_documents": true
  },
  "responses": []
}| Attribute Name | Description |
|---|---|
| id | This is the id of the response |
| created_at | The date and time of when this request was created |
| status | The status of the request |
| archived | If the request has been archived or not |
| user | The contact details of the person to whom the request was sent |
| external_args | In the external_args object you can include parameters that will make it useful for you to process the data |
| flow | The slug of the Penbox flow that was used in this request |
| links : fill | The link that was sent to the user to fill in the request |
| links : app | The link of the request in the Penbox app |
| data : address_zip | The zip code that is pre-filled in the Penbox request |
| data : address_city | The city that is pre-filled in the Penbox request |
| data : address_number | The address number that is pre-filled in the Penbox request |
| data : address_street | The street that is pre-filled in the Penbox request |
| options : ask_legal_documents | The option that is used to determine if the legal documents (id document) has been asked or not in the Penbox request |
| responses | Here you will find the answers of the person filling the Penbox form |
Congrats you completed your first request! Keep your Response id nice and close because you will need it in the next step...
Updated 10 months ago
In the next stage we will look how you can request data back from the request.